Stripes framework and jQuery Autocomplete
Posted onI really enjoy jQuery. But finding the right UI widget can be a daunting task. Autocomplete is one of those widgets.
I decided to share an asynchronous example on how to use the jQuery Autocomplete plugin with Stripes Framework.
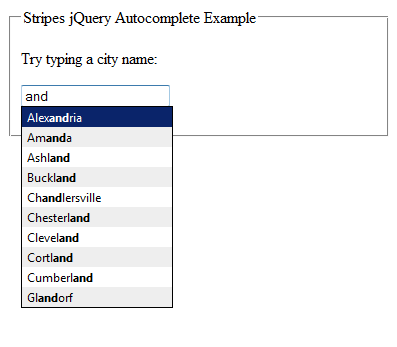
Here’s an example output:
First of all you need to download jQuery (1.2.6) and the last jQuery UI (1.6.rc2).
Then write a simple action bean:
AutocompleteActionBean.java
public class AutocompleteActionBean implements ActionBean {

    private ActionBeanContext context;

    private String q;

    private static final List<string> cities = Arrays.asList(
        "Aberdeen", "Ada", ...);

    // Getters and Setters

    /**
     * Forwards the user to the example page.
     *
     * @return forward to the jsp
     */
    @DefaultHandler
    public Resolution main() {
        return new ForwardResolution("/WEB-INF/autocomplete.jsp");
    }

    /**
     * Returns the city's list for the autocomplete drop down.
     *
     * @return a StreamingResolution with the city's list
     */
    public Resolution autocomplete() {
        StringBuilder results = new StringBuilder();

        if (q != null) {
            for (String city : cities) {
                if (city.indexOf(q) != -1) {
                    results.append(city).append("\n");
                }
            }
        }

        return new StreamingResolution("text/plain", results.toString());
    }
}
The jQuery Autocomplete plugin needs the newline character (”\n”) to separate autocomplete options.
Next, write your JSP, and import the needed CSS and JavaScript files from jQuery and jQuery UI.
autocomplete.jsp
<%@ include file="../includes/taglibs.jsp"%>

<!DOCTYPE html
     PUBLIC "-//W3C//DTD XHTML 1.0 Strict//EN"
     "http://www.w3.org/TR/xhtml1/DTD/xhtml1-strict.dtd">
<html xmlns="http://www.w3.org/1999/xhtml">
    <head>
        <meta http-equiv="Content-Type" content="text/html; charset=UTF-8" />
        <title><fmt:message key="autocomplete.example.title" /></title>
        <link rel="stylesheet" href="/styles/ui.autocomplete.css" />
        <script src="/scripts/jquery-1.2.6.min.js"></script>
        <script src="/scripts/ui.core.min.js"></script>
        <script src="/scripts/ui.autocomplete.min.js"></script>
        <script src="/scripts/script.js"></script>
    </head>
    <body>
        <fieldset>
            <legend><fmt:message key="autocomplete.example.title" /></legend>
            <s:form beanclass="com.samaxes.autocomplete.presentation.action.AutocompleteActionBean" focus="city">
                <p><s:label for="city" /></p>
                <p><s:text id="city" name="city" /></p>
            </s:form>
        </fieldset>
    </body>
</html>
Finally, in your script file, bind the autocomplete event to the input element, and point the URL to the autocomplete handler of the AutocompleteActionBean action bean.
script.js
$(document).ready(function() {
    $('#city').autocomplete({
        url: '/Autocomplete.action?autocomplete=',
        minChars: 1,
        max: 10,
        width: 150,
        scroll: false
    });
})
For the complete list of options for this plugin go http://docs.jquery.com/UI/Autocomplete/autocomplete and click on the “Options” tab.
Comments
comments powered by Disqus